A multimeter is one of the greatest instruments to have on hand if you’re doing any kind of electrical work, regardless of the application. Here’s how to use one and what all those complex symbols represent if you’re just getting started.
Throughout this lesson, I’ll be referring to my own multimeter and using it as an example. Yours may differ significantly in some respects, but for the most part, all multimeters are the same.
Which Multimeter Should You Get?
There isn’t a single multimeter that you should aim for, and it all depends on the features you desire (or don’t need).

You may start with something simple, like this $8 model, which includes everything you’ll need. You can even invest a little more money on something fancier, such as this one from AstroAI. It has an auto-ranging option, so you don’t have to worry about selecting a precise numerical value and worrying if it’s too high or low. It’s also capable of detecting frequency and temperature.
What Do All the Symbols Mean?
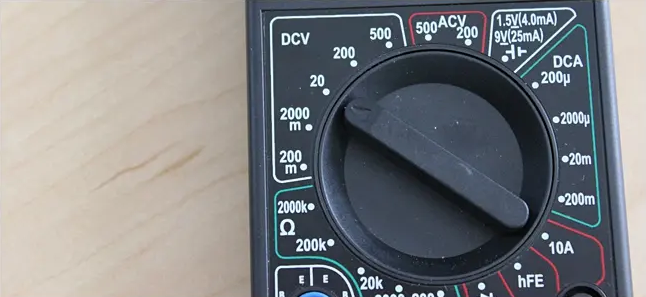
There’s a ton going on when you take a gander at the determination handle on a multimeter, yet in case you’re simply going to do some fundamental stuff, you will not utilize half of the relative multitude of settings. Regardless, here’s a summary of what every image implies on my multimeter:
- Direct Current Voltage (DCV): Sometimes it will be indicated with a V–all things being equal. This setting is utilized to gauge direct current (DC) voltage in things like batteries.
- Alternating Current Voltage (ACV): Sometimes it will be signified with a V~ all things considered. This setting is utilized to gauge the voltage from substituting current sources, which is essentially anything that plugs into a power source, just as the force coming from the power source itself.
- Resistance (Ω): This actions how much opposition there is in the circuit. The lower the number, the simpler it is for the current to course through, as well as the other way around.
- Continuity: Usually signified by a wave or diode image. This basically tests whether a circuit is finished by sending a tiny measure of current through the circuit and checking whether it makes it out to the opposite end. Assuming not, there’s something along the circuit that is causing an issue—discover it!
- Direct Current Amperage (DCA): Similar to DCV, yet rather than giving you a voltage perusing, it will let you know the amperage.
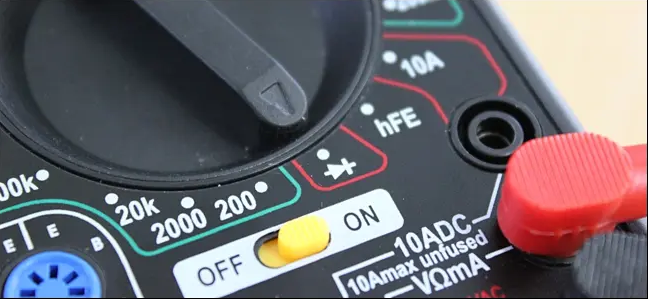
- Direct Current Gain (hFE): This setting is to test semiconductors and their DC acquire, however, it’s generally pointless, since most circuit repairmen and specialists will utilize the coherence check all things being equal.
Your multimeter may likewise have a committed setting for testing the amperage of AA, AAA, and 9V batteries. This setting is normally meant with the battery image.
Once more, you likely will not utilize half of the settings shown, so don’t get overpowered on the off chance that you just know what a couple of them do.
How to Use a Multimeter
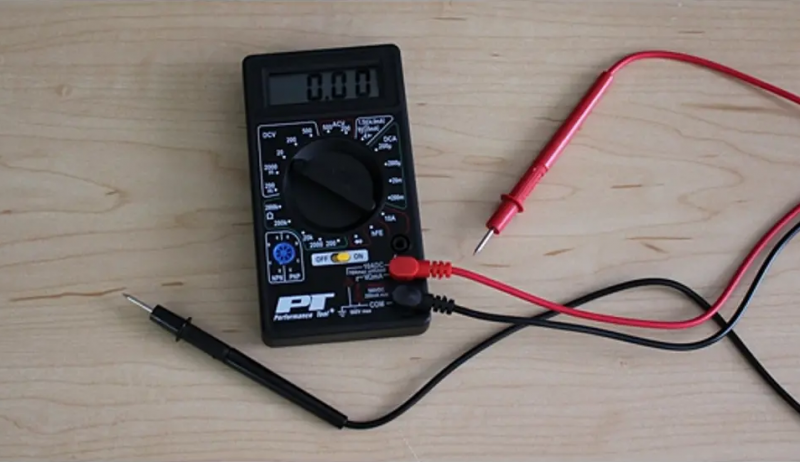
First off, gives up over a portion of the various pieces of a multimeter. At the exceptionally essential level, you have the actual gadget, alongside two tests, which are the dark and red links that have plugs toward one side and metal tips on the other.
The multimeter itself has a presentation at the top, which gives you your readout, and there’s a major choice handle that you can twirl around to choose a particular setting. Each setting may likewise have distinctive number qualities, which are there to gauge various qualities of voltages, protections, and amps. So in the event that you have your multimeter set to 20 in the DCV area, the multimeter will quantify voltages up to 20 volts.

Your multimeter will likewise have a few ports for connecting the tests (presented previously):
- The COM port means “Normal”, and the dark test will consistently plug into this port.
- The VΩmA port (now and again signified as mAVΩ) is essentially an abbreviation for voltage, opposition, and current (in milliamps). This is the place where the red test will plug into in case you’re estimating voltage, opposition, coherence, and current under 200mA.
- The 10ADC port (now and again signified as 10A) is utilized at whatever point you’re estimating current that is more than 200mA. In case you don’t know of the current draw, start with this port. Then again, you would not utilize this port by any means in case you’re estimating something besides current.
Caution: Make sure that in case you’re estimating anything with a current higher than 200mA, you plug the red test into the 10A port, as opposed to the 200mA port. If not you could blow the circuit that is within the multimeter. Moreover, estimating anything more than 10 amps could blow a wire or obliterate the multimeter too.
Your multimeter may have totally isolate ports for estimating amps, while the other port is explicitly only for voltage, obstruction, and progression, however, most less expensive multimeters will share ports.
At any rate, we should begin really utilizing a multimeter. We’ll gauge the voltage of an AA battery, the current draw of a divider clock, and the progression of a straightforward wire as certain guides to kick you off and acquainted with utilizing a multimeter
Testing Voltage
Start by turning on your multimeter, ending the tests into their various ports, and from that point setting the choice handle to the best number worth in the DCV locale, which for my situation is 500 volts. On the off chance that you don’t know fundamentally the voltage degree of what you’re surveying, it’s dependably a savvy thought, in any case, the most raised worth first and along these lines work you’re heading down until you get an accurate examining. You’ll perceive what we mean.
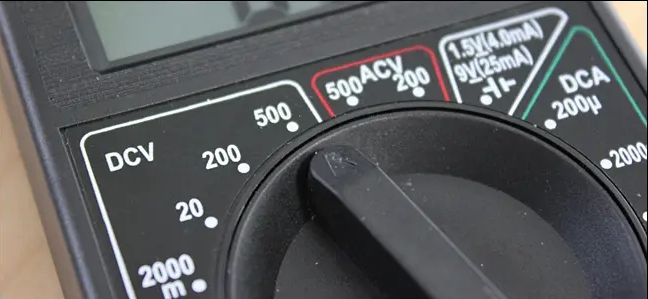
For the current situation, we know the AA battery has a phenomenally low voltage, yet we’ll begin at 200 volts only for instance. Then, place the faint test on the hostile finish of the battery and the red test on the positive end. Analyze the investigating on the screen. Since we have the multimeter set to a high 200 volts, it shows “1.6” on the screen, which suggests 1.6 volts.
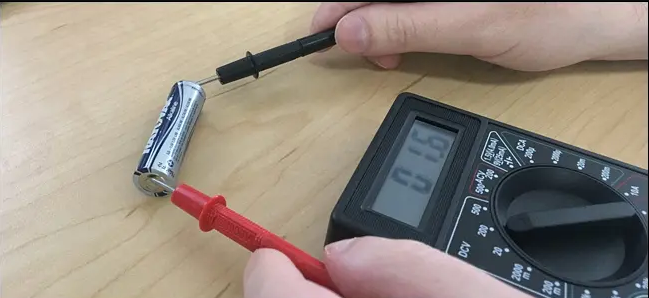
Notwithstanding, I need a more distinct analysis, so I’ll move the confirmation handle lower down to 20 volts. Here, you can see that we have a more careful looking at that coasts some spot in the extent of 1.60 and 1.61 volts. Acceptable for me

In case you were to whenever set the confirmation handle to a number worth lower than the voltage of what you’re trying, the multimeter would just inspect “1”, deducing that it’s over-inconvenience. So if I somehow sorted out some way to set the handle to 200 millivolts (0.2 volts), the 1.6 volts of the AA battery is an incredible arrangement for the multimeter to oversee at that setting.
In any case, you may be asking worriedly about for what reason you would have to test the voltage of something in any case. Certainly, for the current situation with the AA battery, we’re checking whether it has any juice left. At 1.6 volts, that is a completely stacked battery. Regardless, in case it somehow wound up inspecting 1.2 volts, it’s nearby being unusable.
In a more functional circumstance, you could do this kind of surveying on a vehicle battery to check whether it very well may be passing on of course if the alternator (which is the thing that charges the battery) is turning sour. A looking at between 12.4-12.7 volts proposes that the battery is fit as a fiddle. Anything lower and that is an affirmation of a perishing battery. In addition, fire your vehicle up and fire up it a piece. Anticipating that the voltage doesn’t augmentation should be around 14 volts or somewhere near there, considering everything, the alternator is having issues.
Testing Current (Amps)
Testing the current draw of something is somewhat trickier, as the multimeter should be associated in series. This implies that the circuit you’re trying should be broken first, and afterward, your multimeter is put in the middle of that crush to associate the circuit spirit up. Essentially, you need to intrude on the progression of current as it were—you can’t simply stick the tests onto the circuit any place.
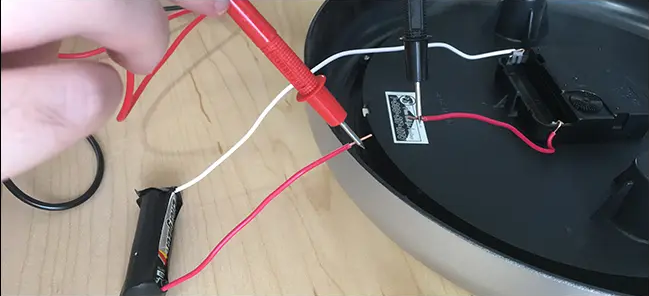
Above is a rough mockup of what this would resemble with an essential clock running off of an AA battery. On the positive side, the wire going from the battery to the clock is separated. We just spot our two tests in the middle of that break to finish the circuit once more (with the red test associated with the force source), just this time our multimeter will peruse out the amps that the clock is pulling, which for this situation is around 0.08 mA.
While most multimeters can likewise quantify substituting current (AC), it’s not actually a smart thought (particularly if it’s life force), since AC can be perilous on the off chance that you wind up committing an error. In the event that you need to see whether an outlet is working, utilize a non-contact analyzer all things being equal.
Testing Continuity
Presently, how about we test the progression of a circuit. For our situation, we’ll improve on things a considerable amount and will simply utilize a copper wire, yet you can imagine that there’s a perplexing circuit in the middle of the two finishes, or that the wire is a sound link and you need to ensure it’s turned out great.
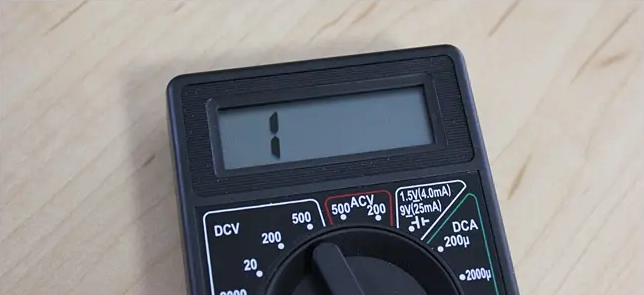
Set your multimeter to the congruity setting utilizing the determination handle.
The readout on the screen will in a split second read “1”, which implies that there isn’t any progression. This would be right since we haven’t associated the tests with anything yet.
Then, ensure the circuit is turned off and has no force. Then, at that point, associate one test to one finish of the wire and the other test to the opposite end—it doesn’t make any difference which test goes on which end. In case there is a finished circuit, your multimeter will either signal, show a “0”, or some different option from a “1”. Assuming it actually shows a “1”, there’s an issue and your circuit isn’t finished.
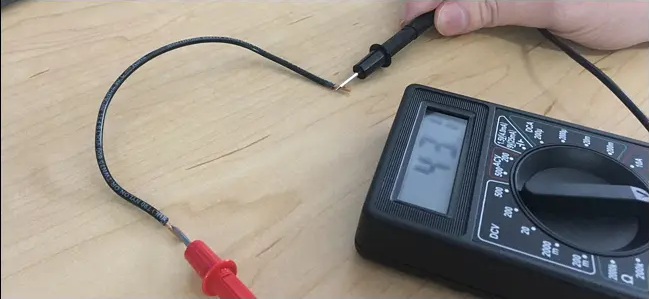
You can likewise test that the coherence includes chips away at your multimeter by contacting the two tests to one another. This finishes the circuit and your multimeter should tell you that.
Those are a portion of the essentials, however, make certain to peruse your multimeter’s manual for points of interest. This aide is intended to be a beginning stage to get you going, and it’s entirely conceivable that a few things displayed above are distinctive on your specific model.


299 Comments