
You needn’t bother with any exceptional programming to make a custom guide for yourself or others. Google Maps is all you need, permitting you to add your own pinpoints, shapes, and headings to a custom guide. Here’s the secret.
You’ll have to utilize Google Maps in your work area to do this. In case you’re having issues with a clear Google Maps screen, you’ll likewise have to clear your site information.
Creating a Custom Map in Google Maps
A custom guide in Google Maps doesn’t permit you to make another scene—you’re left with planet Earth. What it permits you to do, notwithstanding, is add your own milestones, courses, and areas.
You can likewise draw your own shapes onto the current guide to add detail to the current guide. While you can see a custom guide in the Google Maps application for Android and iOS, you can just make it utilizing the web variant of Google Maps in your work area.
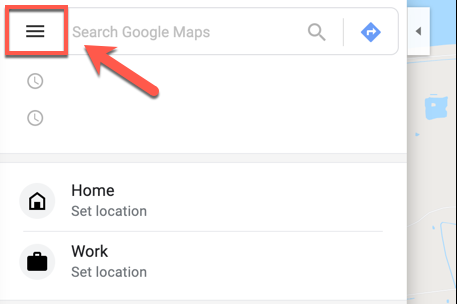
To begin, head to the Google Maps site, and sign in utilizing your Google account. Whenever you’re endorsed in, press the burger menu symbol in the upper left.
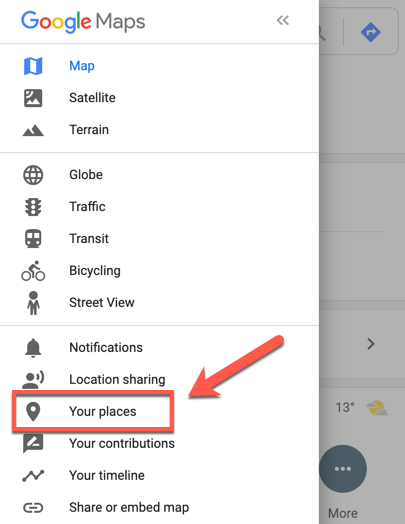
In the alternatives menu, click the “Your Places” choice.
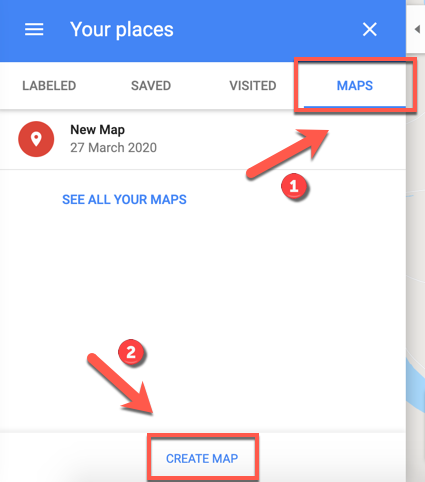
In the “Your Places” menu that shows up on the left, click the “Guides” tab. At the lower part of the menu, select the “Make Map” button.
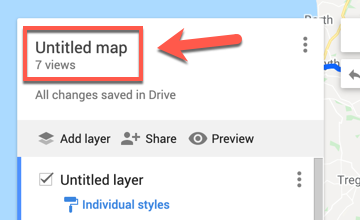
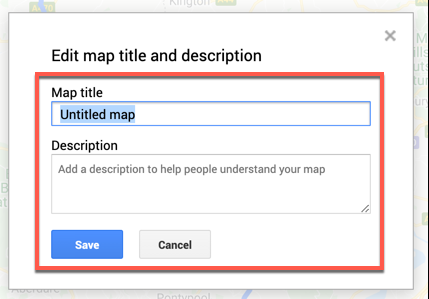
The guide creation window will show up in another tab. To name it, select the “Untitled guide” text at the highest point of the menu on the left.
In the “Alter map title and depiction” menu, add a name and portrayal for your guide and afterward click “Save” to save it.
Custom Map Layers
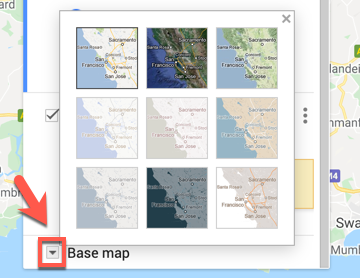
Your custom guide is comprised of layers, with the “Base Map” layer (the primary Google Maps see) at the base.
You can modify the presence of the “Base Map” layer by choosing the choices bolt close to “Base Map” and picking an alternate guide topic.
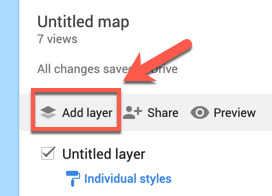
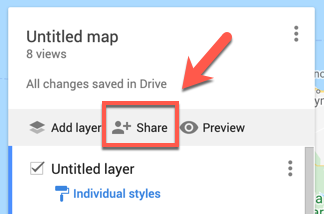
At the point when you make another custom guide in Google Maps, a new “Untitled Layer” is added of course.
You can add however many layers as you need to your custom guide, permitting you to isolate the various parts of your new guide from one another, by tapping the “Add layer” button.
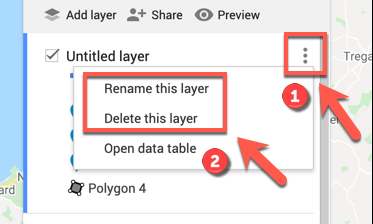
Assuming you need to rename this layer, select the three-dab menu symbol close to the layer and afterward click “Rename Layer” in the drop-down menu.
To erase it, select “Erase Layer” all things considered.
Adding Components to a Custom Map in Google Maps
A custom guide in Google Maps can be redone with different various parts. You can add marker focuses, shapes, or lines, just as headings straightforwardly onto the guide.
To begin, ensure you’re in the custom guide manager by making a beeline for the Google Maps site and choosing the burger menu > Your Places > Maps > Create Map.
Adding a Marker Point
A custom marker point is a pinpoint that shows up on the guide. You can utilize this to add extra depictions to a space, just as to point map clients to an area or region that isn’t indicated on the “Base Map” layer.
To add another marker to highlight your guide, ensure you’ve found a reasonable region on the “Base Map” layer. At the point when you’re prepared, select the “Add Marker” button in the menu underneath the hunt bar in the custom guide manager.
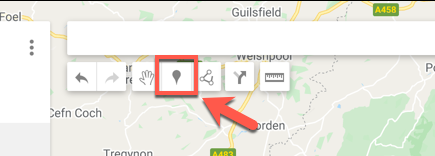
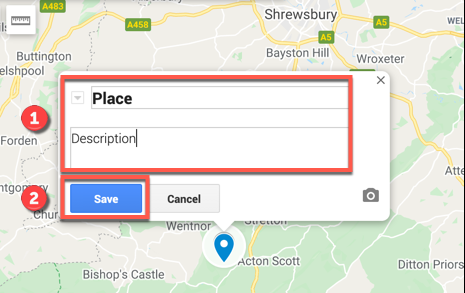
Utilizing your mouse or trackpad, click on a space of the guide. This will raise the marker supervisor—add a reasonable name and portrayal and afterward select “Save” to add it to your guide.
Adding Lines or Shapes
You can add custom lines and shapes to your custom guide to accentuate certain regions.
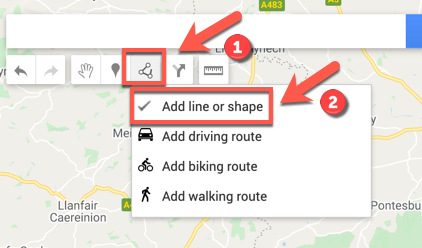
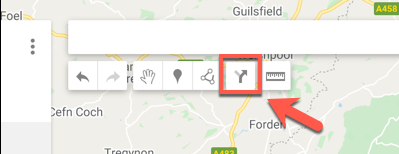
To do this, click the “Define a Boundary” choice in the menu underneath the pursuit bar and afterwards select the “Add line or shape” alternative.
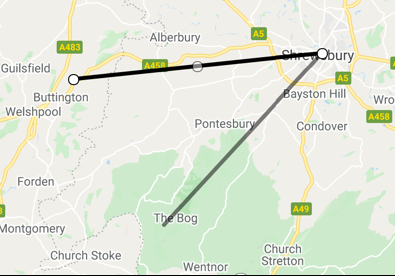
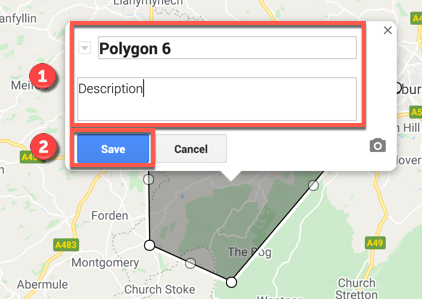
In an appropriate region on the guide, define a boundary utilizing your mouse or trackpad—utilize different lines to make a signed-up shape.
Add a custom name and portrayal to your item in the spring-up menu prior to choosing “Save” to affirm.
Creating Custom Directions
By adding a directions layer to a custom map, you may communicate instructions from point A to point B.
To do so, go to the menu below the search bar and select “Add Directions” from the drop-down menu.
The instructions layer will show up in the left-hand menu. Fill in the “A” text box with your departure point and the “B” text box with your arrival point.
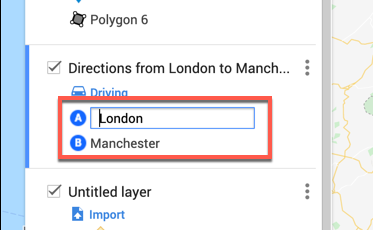
The map will update to show the route between your specified sites after both the “A” and “B” boxes are filled.
Sharing Custom Maps in Google Maps
Whenever you’ve made your guide, you’re allowed to get to it yourself from inside Google Maps (cheeseburger menu > Your Places > Maps) or from the Google My Maps site.
No one but you can see your custom guide, of course, however, you can impart it to other people. To do this, head to the Google My Maps site, sign in, and afterwards select the “Possessed” tab where your custom guide ought to be recorded.
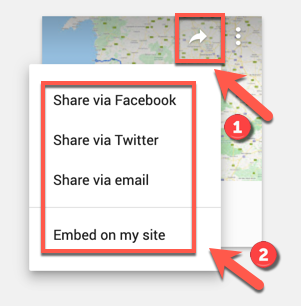
To impart it to other people, click the “Offer Map” button. This will give you choices to share your custom guide on different online media stages, through email, or by implanting it on your site.
Select one of these choices to continue.
You can likewise snatch a custom connection to your guide that will permit you to impart it to others straightforwardly.
In the “Claimed” tab of the Google My Maps site, select your guide to get back to the guide supervisor and afterward click the “Offer” button in the left-hand menu.
This will raise the “Connection Sharing” choices menu. Under the “Who Has Access” segment, select the “Change” button.
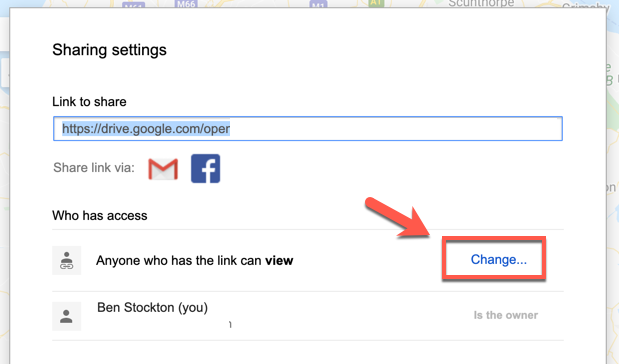
In the “Connection Sharing” choices menu, select the degree of access for your guide. You can confine admittance to explicit Google account clients, permit admittance to any individual who has the common connection or unveil your guide all things being equal.
Whenever you’ve chosen your picked sharing level, click “Save” to save the determination.

Your common settings will be saved now, permitting you to welcome explicit clients to see it by email greeting or by sharing the connection to your custom guide to a more extensive arrangement of clients straightforwardly.